
Rider Guides & Expert Maintenance Tips, Post
The DIY Guide to Replacing HJC Accessories: Vents, Visor Latches, and Chin Curtains
May
One of the greatest advantages of investing in a premium brand like HJC is the modularity of their designs. Unlike budget “single-use” helmets where a broken plastic part means the entire unit is destined for the landfill, HJC helmets are engineered as a collection of replaceable components. Whether a top vent was snapped off during a clumsy garage moment, your chin curtain has become frayed from years of use, or your visor latches have lost their “click,” you don’t need to send your helmet back to the factory for a professional overhaul.
Most of these repairs can be executed at your kitchen table in under twenty minutes with basic household tools. Mastering these DIY fixes not only saves you significant maintenance costs but also ensures your helmet remains in peak aerodynamic and aesthetic condition for its entire five-year lifespan.
In this guide, we will walk you through the technical process of replacing common HJC accessories, sharing the “Pro Tips” for handling delicate plastic tabs, managing baseplate tension, and using the “Hairdryer Trick” to safely remove adhesive-mounted parts.
1. The Entry-Level Fix: Chin Curtains and Breath Guards
The Chin Curtain and Breath Guard are the most frequently replaced accessories. Because they are positioned in high-friction areas—rubbing against your nose and chin every time you don or doff the helmet—the fabric and rubber eventually wear out. Fortunately, these are usually “friction-fit” components that require zero tools.
Replacing the Chin Curtain
Most HJC models, including the i71 and C10, use a plastic “comb” or tab system.
Extraction: Grip the plastic rim of the old chin curtain and pull it directly away from the gap between the EPS liner and the outer shell.
Installation: Align the new curtain centered with the chin bar. Start at the middle and push the plastic tab into the gap using your fingernail or a plastic pry tool. Work your way to the edges until the fabric sits flush.
The Pro Tip: If the gap feels too tight, a tiny drop of water (no soap!) on the plastic tab can act as a temporary lubricant to help it slide in.
Replacing the Breath Guard
The breath guard is anchored by small rubber or plastic “pegs” that slot into the top of the chin bar.
The Pull: Pull the old guard straight up.
The Seat: When installing the new one, ensure every single peg is fully seated. If even one peg is loose, the guard will vibrate at high speeds, creating an annoying buzzing sound inside your visor.
2. The Mechanical Heart: Visor Baseplates and Central Latches
If your visor no longer stays open in intermediate positions, or if it feels “wobbly” when you rotate it, the internal teeth of your RapidFire Baseplates are likely worn down. Similarly, if your central locking button (common on the i71 and RPHA 12) is sticking, it’s time for a replacement.
Swapping the Baseplates
Visor Off: Use the RapidFire trigger to remove the shield.
The Screws: You will see two Phillips-head screws holding the plastic plate to the shell. Use a high-quality screwdriver with the correct bit size to avoid stripping the heads.
Alignment: When installing the new plates, do not tighten the screws completely at first. Leave them slightly loose, install the visor, and check the seal against the rubber gasket (using the “Paper Test” from Article #21). Once the visor is centered, tighten the screws firmly.
Warning: The screws are threading into metal inserts within the composite shell. Do not over-tighten. Over-torquing can strip the internal threads, which is a permanent, non-fixable shell failure.
Replacing the Central Visor Latch
The central latch on the chin bar is a spring-loaded unit. To replace it, you typically need to access it from behind the chin bar padding.
Remove the internal chin padding.
Unclip the spring-tensioned latch from its housing.
Snap the new unit in, ensuring the spring is oriented correctly. A “crunchy” feeling when you press the button usually means the spring is misaligned.
3. The Precision Task: Top and Chin Vents
Replacing a broken vent is the most intimidating DIY task because many HJC vents are secured with a combination of plastic clips and high-strength adhesive tape. If you simply try to “rip” a broken vent off, you risk tearing the paint or the clear coat off your beautiful helmet graphics.
The “Hairdryer Trick”
Professional gear technicians use a heat gun, but a standard household hairdryer on the Low/Medium setting is much safer for a DIYer.
Heat it Up: Apply gentle heat to the broken vent for 60 seconds. This softens the adhesive bond and makes the plastic tabs slightly more flexible.
The Plastic Pry: Use a plastic “spudger” (like those used for phone repairs) or a guitar pick to gently lift the edge of the vent. Never use a metal screwdriver, as it will instantly gouge your shell.
Clean the Surface: Use a cloth dipped in 70% Isopropyl Alcohol to remove any leftover sticky residue. The surface must be 100% clean and “squeaky” for the new adhesive to bond.
The Snap and Stick: Align the new vent carefully. Once you press it down, the adhesive is active—you won’t get a second chance to center it. Apply firm pressure for 30 seconds to set the bond.
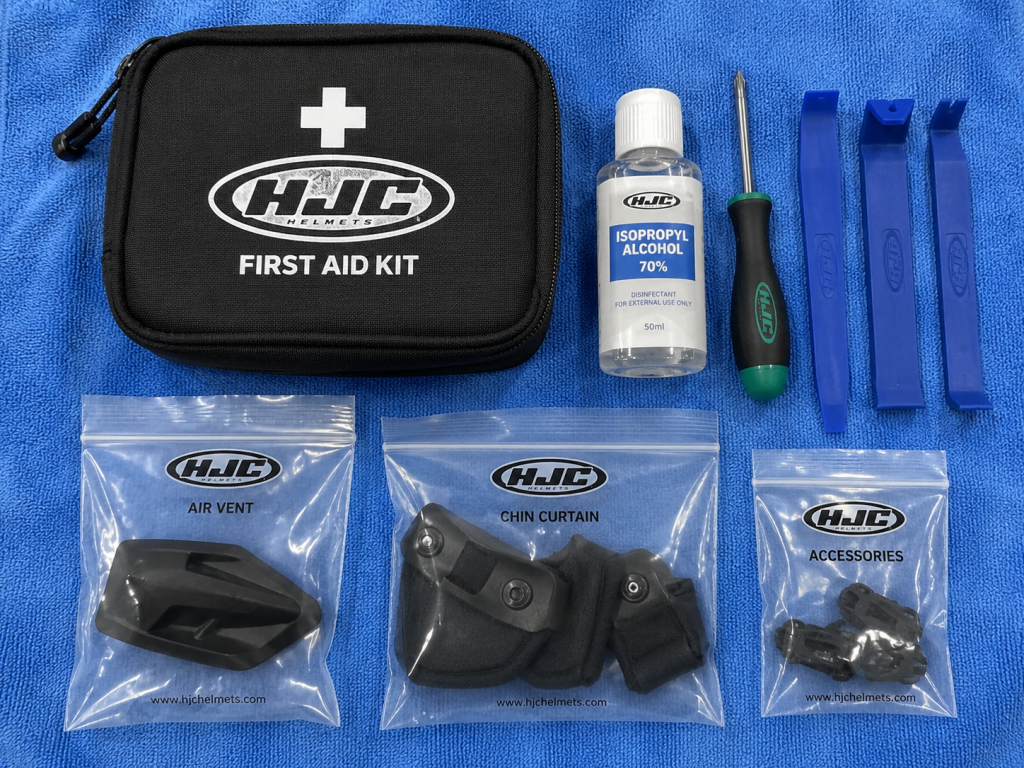
4. The Essential DIY Tool Kit for HJC Owners
To handle 90% of helmet repairs at home, you only need a small “Helmet First Aid Kit” kept in your garage:
+---------------------------+-----------------------------------------------+
| Tool                      | Purpose                                       |
+---------------------------+-----------------------------------------------+
| Phillips #1 & #2 Drivers  | For baseplate and internal screws.            |
| Plastic Pry Tools/Picks   | For lifting vents and chin curtains safely.   |
| 70% Isopropyl Alcohol     | For removing adhesive residue and cleaning.   |
| Silicone Oil (HJC OEM)    | For lubricating gaskets and moving latches.   |
| Microfiber Cloths         | To protect the helmet shell from scratches.   |
| Household Hairdryer       | For softening adhesives on vents.              |
+---------------------------+-----------------------------------------------+
5. When to Stop: The “Safety Redline”
While HJC encourages modularity, there are certain parts you should NEVER attempt to DIY or “hack” back together:
The EPS Liner: If the internal foam is cracked or loose, the helmet is dead. Never try to glue EPS foam back together; the solvents in most glues will literally dissolve the foam.
The Chin Strap: Never attempt to sew or re-rivet a frayed chin strap yourself. This is a critical structural failure that requires factory-certified machinery to repair.
Outer Shell Cracks: If the composite/polycarbonate shell is cracked, no amount of glue or “filler” will restore its structural integrity.
Final Review Summary: DIY Pros and Cons
Pros
Extends Life: Keep your helmet looking and performing like new for the full 5-year cycle.
Cost Effective: Individual vents and latches usually cost between $10 and $25, far cheaper than a new helmet.
Customization: DIY skills allow you to swap in different colored vents or accessories to create a “custom” look.
Zero Down-Time: No need to ship your helmet away for weeks of professional repair.
Cons
Risk of Cosmetic Damage: Clumsy use of tools can scratch the paint or clear coat.
Voiding Warranty: Always check your local warranty terms; in some regions, “unauthorized” tampering with vents can technically void your paint warranty.
Final Verdict
HJC’s commitment to modularity is a gift to the practical rider. By learning how to replace your own vents, align your baseplates, and refresh your chin curtains, you transform from a passive consumer into an expert caretaker of your safety gear. Your helmet isn’t just a static object—it’s an evolving piece of equipment. Treat it with a little mechanical respect, and it will remain the quiet, comfortable, and sharp-looking fortress it was designed to be.