
Technology & Safety Standards Breakdown, Post
What Is a Pinlock Anti-Fog Lens? A Step-by-Step Guide to Installing It on Your HJC i71
May
HJC For year-round motorcycle commuters and long-distance touring enthusiasts, riding through changing weather conditions is a standard part of life on two wheels. While rain, mist, and dropping temperatures present external challenges for traction and visibility, they also trigger a frustrating and dangerous internal problem: visor fogging.
Imagine cruising down a fast highway or navigating dense urban traffic when a sudden rain shower hits. Within seconds, your warm breath hits the cold plastic face shield, causing thick condensation to form directly in your line of sight.
In a desperate bid to restore vision, many riders resort to cracking their visor open. While this clears the fog, it introduces a miserable trade-off: freezing wind and driving rain blast directly into your face and eyes, compromising your focus and safety.
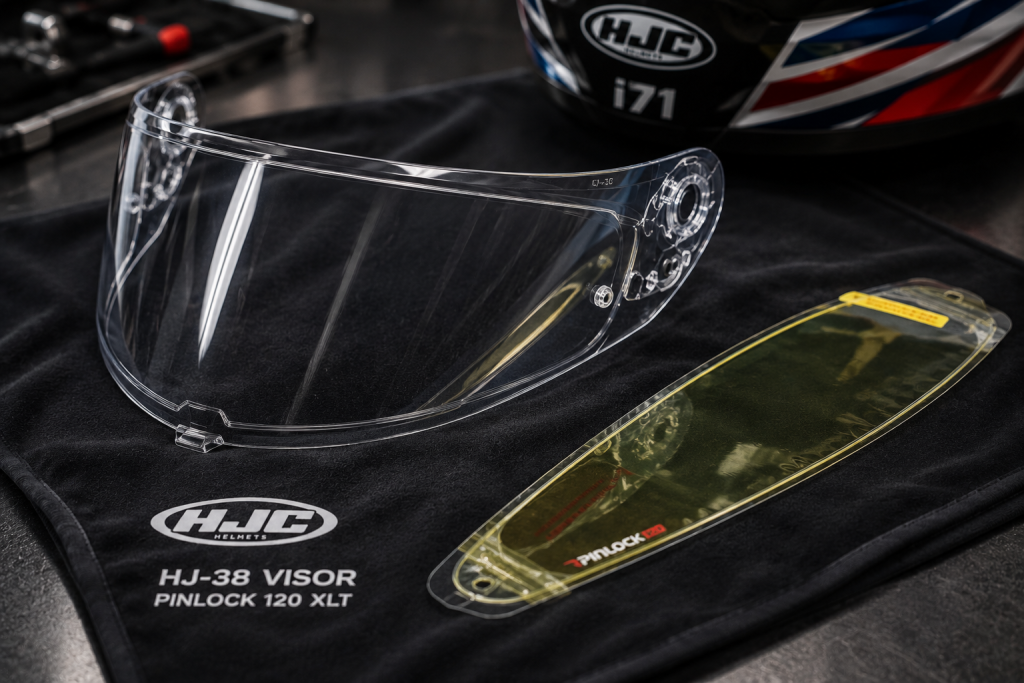
Fortunately, modern motorcycle optics have completely solved this elemental dilemma through a revolutionary invention: the Pinlock anti-fog lens insert. If you have recently purchased a premium sport-touring helmet like the HJC i71, you will notice that the clear HJC-38 face shield comes standard with two plastic pins pre-installed on the interior surface, and a clear Pinlock lens insert is included right in the standard box.
To help you achieve perfect optical clarity in any weather, this technical guide will explain the underlying physics of how Pinlock technology eliminates condensation, provide a meticulous step-by-step installation walkthrough tailored specifically for the HJC i71, and share essential maintenance tips to extend the life of your anti-fog shield.
1. The Science of Condensation: How Pinlock Eliminates Visor Fog
To understand why the Pinlock system is so profoundly effective, one must first look at the thermodynamic physics of how a motorcycle visor fogs up in the first place. Visor fogging is dictated by a thermal threshold known as the dew point.
When you ride in cold, humid, or rainy weather, the external plastic face shield is cooled rapidly by the oncoming atmospheric air. Inside the helmet, however, your face radiates body heat, and your lungs expel warm, highly humid breath.
When this warm, moisture-rich air makes contact with the cold interior surface of the visor, the air drops below its dew point instantly. The suspended water vapor transitions into liquid form, condensing into millions of microscopic water droplets that scatter light and completely blind the rider.
+-----------------------------------------------------------------------+
| THE DOUBLE-GLAZING PRINCIPLE OF PINLOCK TECH                          |
+-----------------------------------------------------------------------+
| Outer Environment: Cold atmospheric air chilling the HJ-38 Visor      |
| The Boundary Layer: Hermetically sealed, stagnant pocket of dry air   |
| Inner Environment: Warm, humid rider breath hitting the Pinlock Lens  |
| The Result: Temperature equalization prevents dew point condensation  |
+-----------------------------------------------------------------------+
The Pinlock insert defeats this process by utilizing the exact same double-glazing principle found in high-end architectural windows. The insert itself is crafted from a highly specialized, moisture-absorbing organic plastic material. Along the entire outer boundary of the Pinlock lens is a continuous, raised silicone bead gasket.
When the lens is pressed firmly against the interior of the HJC HJ-38 visor, this silicone gasket forms a hermetic, airtight seal. This seal traps a stagnant pocket of dry air between the main face shield and the Pinlock insert, acting as an intense thermal barrier layer.
This insulating air pocket effectively equalizes the temperature differential: the outer visor stays cold, the inner Pinlock lens matches your warm facial temperature, and the dew point threshold is neutralized. Condensation becomes physically impossible, granting you an uncompromised, crystal-clear view of the road even when riding through freezing winter rain downpours.
2. Preparing Your Workspace and Pre-Installation Cleaning
Installing a Pinlock lens insert requires physical precision and cleanliness. Because the lens is going to be hermetically sealed against the interior of your HJ-38 shield, any dust particles, oily fingerprints, or smudges trapped inside the air pocket will remain permanently in your field of vision until you disassemble the entire unit.
Establish a Clean Room Environment
Choose a clean, indoor workspace completely free from wind, pet dander, and airborne dust. Lay down a clean, plush microfiber towel or a soft foam mat on your workbench to act as a protective staging pad. This prevents your expensive HJC i71 shell and visor from sustaining surface scratches during the installation process. Wash and thoroughly dry your hands to remove any natural skin oils before touching the optical components.
Remove the HJC – 38 Shield via the RapidFire System
HJC makes shield removal exceptionally easy thanks to their tool-less RapidFire Shield Replacement System.
Raise the HJC – 38 clear face shield completely to its maximum open position.
Locate the spring-loaded release levers positioned on the side gear plates.
Pull the levers downward; the visor will instantly pop loose from its tracks.
Place the helmet safely aside on your soft mat.
3. Step-by-Step Installation Walkthrough for the HJC i71
With the HJ-38 shield detached, follow these exact mechanical steps to install your Pinlock insert cleanly and securely:
Step 1: Clean the Interior Surface
Before bringing the Pinlock lens near the visor, spray the interior surface of the HJ-38 shield with a dedicated, alcohol-free helmet visor cleaner or use lukewarm water mixed with a single drop of mild dish soap. Wipe the surface completely clean using a pristine, lint-free microfiber cloth. Ensure the surface is 100% bone-dry and check it under a bright light source to guarantee there are zero dust specks or smudges left behind.
Step 2: Understand the Orientations
Unpack the Pinlock insert from its protective sleeve. Handle the insert strictly by its external edges; never touch the flat face of the lens with your bare fingers. Identify the two sides of the insert:
The Silicone Gasket Side: The side featuring the raised, flexible silicone bead. This side MUST face directly against the interior surface of the HJ-38 shield.
The Protective Film Side: The side featuring a yellow or clear protective plastic film. This side will face toward your face inside the helmet.
Step 3: Flex the Visor Flat
This is the step that causes the most anxiety for new riders, but it is a standard mechanical requirement. Hold the HJ-38 shield by its outer ends. Using your fingers, carefully flatten and flex the visor outward, reducing its natural organic curve. HJC’s optical polycarbonate is incredibly resilient and flexible; it will not snap or crack under controlled hand tension. Flattening the visor increases the linear distance between the two anchoring pins, allowing the Pinlock lens to slide into place effortlessly.
[Visor End] ---> Flex Visor Outward (Flattens Curve) <--- [Visor End]
                       |
     Align Pinlock Notch onto Left Pin
                       |
     Align Pinlock Notch onto Right Pin
                       |
  Slowly Release Hand Tension (Visor Snaps Back)
                       |
  Silicone Gasket Compresses Uniformly against Visor Face
Step 4: Anchor the Notches Onto the Pins
While maintaining the outward flex with one hand, use your other hand to position the Pinlock insert. Slide the crescent-shaped notch on the left end of the Pinlock lens over the left plastic anchoring pin on the visor. Once anchored, carefully sweep the lens across the interior face of the shield and slide the right-side notch over the right anchoring pin.
Step 5: Release Tension and Inspect the Seal
Slowly and gently release your hand tension, allowing the HJ-38 visor to spring back into its natural, curved profile. As the visor curls back, it will clamp down tightly onto the Pinlock insert, compressing the silicone bead uniformally against the face shield.
Hold the assembly up to a bright light and inspect the entire boundary path of the silicone bead. The bead should make 100%, continuous contact with the plastic shield around its entire perimeter. If you see any gaps, air bubbles, or lifted sections, the seal is compromised, and humid air will leak inside, causing localized fogging.
Step 6: Peel the Protective Film
Once you have confirmed a perfect, flawless seal, grip the small pull-tab on the corner of the Pinlock lens and slowly peel away the colored protective plastic film. Reinstall the HJ-38 shield onto your HJC i71 helmet by aligning the pivot points with the gear plates and pushing down until they snap locked into place. Your helmet is now fully weaponized against cold-weather fogging!
4. Fine-Tuning the Eccentric Pins for a Perfect Seal
Many riders are completely unaware that the plastic pins pre-installed on their HJC visors are not basic static pegs. They are actually highly sophisticated eccentric adjusting pins. If you look closely at the outer face of the pins on the exterior of the visor, you will notice a small indicator arrow or an off-center slot.
Because the silicone gasket on the Pinlock lens is made of soft material, it can compress or settle slightly over months of heavy road vibrations and seasonal temperature shifts. If the seal becomes loose and develops micro-gaps, you do not need to buy a new lens.
Simply take a flat-head screwdriver or the specific adjustment tool provided by Pinlock, and carefully rotate the eccentric pins from the outside of the visor. Because the pins are offset, rotating them increases the structural tension, pushing the anchoring pegs closer together. This forces the Pinlock insert tighter against the face shield, restoring a flawless, hermetic weather seal instantly.
5. Critical Maintenance Rules to Protect Your Pinlock Investment
The organic, moisture-absorbing material that allows a Pinlock lens to perform its anti-fog magic is significantly softer and more delicate than the hard-coated polycarbonate of the main HJC visor. To prevent permanent ruin, you must follow these strict maintenance parameters:
Never Wipe a Dry Pinlock Lens: If dust or lint settles on the Pinlock lens, never attempt to wipe it away with a dry microfiber cloth or your t-shirt. The soft material will scratch instantly, creating micro-marring lines that catch headlight glare at night, blinding you. Always disassemble the lens and rinse it under clean running water first to lift debris.
Avoid Harsh Chemicals: Never clean your Pinlock lens using aggressive glass cleaners, ammonia-based sprays, or motorcycle detailing chemicals. These volatile fluids will chemically dissolve the anti-fog properties and warp the plastic matrix. Use only lukewarm water and mild, neutral soap.
Allow to Air Dry Completely: After rinsing your Pinlock insert, do not use paper towels to dry it, as paper fibers are highly abrasive. Shake off excess water drops and allow the lens to air dry completely in a dust-free environment before reassembly.
Final Review Summary: Pros and Cons of Pinlock Technology
Pros
Flawless Anti-Fog Defense: 100% effective at eliminating visor condensation in freezing rain or humid climates.
Double-Glazing Engineering: Reliable thermal barrier layer equalizes internal and external temperatures perfectly.
Tunable Tension: Eccentric anchoring pins allow for easy, long-term adjustment to maintain a hermetic seal.
Standard Box Inclusion: Standard HJC i71 packages include the Pinlock-ready HJ-38 shield and insert out of the factory.
Cons
Extreme Scratch Sensitivity: Soft organic material requires meticulous, gentle cleaning protocols.
Slight Optical Reflections: Adding a secondary lens layer can occasionally create minor double-image halos around oncoming bright streetlights during pitch-black night riding, though this is a minor trade-off for absolute fog-free safety.
Final Verdict
The Pinlock anti-fog lens insert is an absolute non-negotiable asset for any motorcyclist who refuses to let seasonal weather updates dictate their riding routine. By creating a flawless thermal shield inside your HJC i71’s HJ-38 visor, it systematically neutralizes the dangerous threat of blind condensation, allowing you to ride through heavy downpours and cold winter mornings with absolute optical confidence. While it demands a gentle, disciplined hand during installation and maintenance, its performance-enhancing capabilities and life-saving safety advantages make it an exceptional, high-value addition to your riding kit that is worth every single penny.