
Rider Guides & Expert Maintenance Tips, Post
The Step-by-Step Guide to Deep Cleaning Your HJC Helmet Liner Without Damaging Its Form
May
HJC For a dedicated motorcyclist, a helmet is far more than a piece of safety equipment; it is a personal sanctuary that accompanies you through every twist, turn, and long-distance journey. However, because it sits in direct contact with your skin, hair, and breath, the interior of your HJC helmet eventually becomes a collector for sweat, facial oils, dead skin cells, and atmospheric dust.
Left unmanaged, these organic residues do more than just create a stale, “old helmet” odor. Over time, the acidic nature of human sweat and oils can begin to chemically break down the delicate fibers of your Silvercool or Supercool lining, causing the padding to lose its elastic “memory” and structural density. When a liner loses its form, the helmet begins to fit loosely, compromising both your high-speed aerodynamic stability and your safety.
Many riders hesitate to deep clean their helmet liners, fearing that a thorough wash will warp the 3D-contoured foam or cause the fabric to pill and fray. However, with a disciplined, “low-stress” approach, you can restore your HJC interior to factory-fresh levels of hygiene without sacrificing its ergonomic shape.
In this comprehensive expert guide, we will walk you through the professional step-by-step process of deep cleaning your HJC helmet liner, covering everything from delicate extraction and the “Baby Shampoo” wash method to the critical science of air-drying without heat.
1. Step 1: Preparation and the Art of “Low-Stress” Removal
The most common way helmet liners are damaged is not during the washing process, but during a hurried or aggressive removal. Modern HJC helmets, such as the i71, RPHA 1, and C10, utilize high-strength plastic snaps and specialized Velcro tracks to anchor the interior.
Establish a Clean Staging Area
Before you begin, find a clean, well-lit workspace. Lay down a plush microfiber towel to rest your helmet shell on. This prevents the exterior graphics from sustaining scratches while you are working on the interior. Remove any external accessories, such as action camera mounts or Smart HJC Bluetooth units, to prevent water exposure.
The Sequence of Extraction
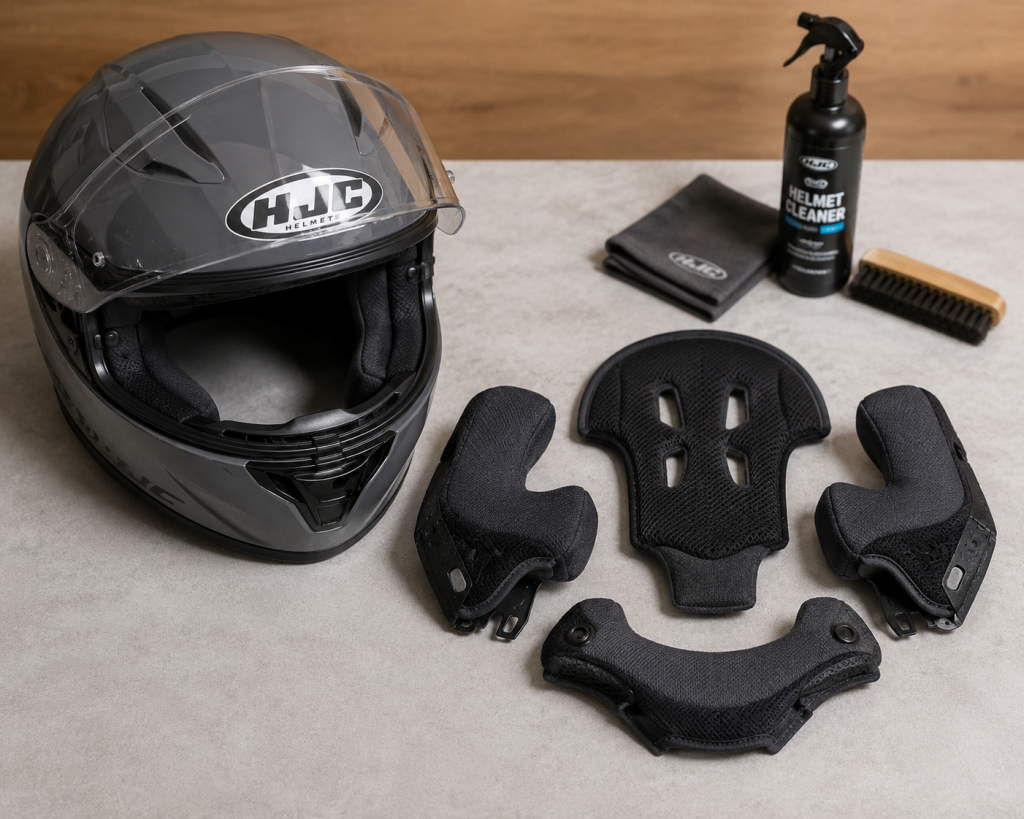
Remove the Breath Guard and Chin Curtain: These are usually held in by friction or small plastic tabs. Pull them gently away from the chin bar.
The Cheek Pads: Grip the cheek pad near the bottom rim of the helmet. Locate the physical snap points (usually three per side) and pull directly upward on the padding near the snap. Never pull from the fabric edge, as this can tear the stitching away from the plastic anchoring plate.
The Crown Liner: Locate the snaps at the rear of the head and the plastic “brow tab” at the front. Unsnap the rear first, then gently slide the front plastic tab out of its slot.
2. Step 2: The “Baby Shampoo” Wash Method
HJC’s technical liners (Silvercool/Supercool) are engineered with advanced capillary channels designed to wick moisture. To preserve these channels, you must avoid harsh household detergents, laundry pods, or fabric softeners, which leave behind chemical residues that “clog” the fabric and reduce its cooling efficiency.
+-----------------------------------------------------------------------+
| THE IDEAL CLEANING SOLUTION PARAMETERS                                |
+-----------------------------------------------------------------------+
| Water Temperature: Lukewarm (Max 30°C / 86°F)                         |
| Primary Agent: Baby Shampoo or Neutral PH Gear Wash                   |
| Why: No harsh chemicals; leaves zero sticky residue on foam pores     |
| Avoid: Bleach, Fabric Softeners, or High-Alkaline Laundry Soaps       |
+-----------------------------------------------------------------------+
The Immersion Process
Fill a clean sink or a plastic basin with lukewarm water and add a capful of baby shampoo. Submerge the cheek pads and crown liner completely. Allow them to soak for 10 to 15 minutes. This duration is vital because it allows the soapy water to naturally dissolve the hardened oils and salt crystals trapped deep within the open-cell foam structure.
The Gentle Massage Technique
Never scrub or wring the pads. Instead, use a gentle “massaging” motion. Squeeze the pads repeatedly while submerged to force the soapy water through the foam. You will likely see the water turn a cloudy grey—this is the extracted sweat and road grime. Continue this process until the pads feel light and the water remains relatively clear.
3. Step 3: The De-Soaping and Rinsing Phase
Residual soap is a common cause of post-cleaning “helmet itch.” If even a trace amount of soap remains trapped inside the 3D foam, it will react with your sweat during your next ride, causing skin irritation and localized rashes on your forehead and cheeks.
Purge the Basin: Drain the dirty, soapy water and refill the basin with clean, cool water.
The Rinse Cycle: Submerge the liners and perform the same squeezing motion. Repeat this at least three times, or until the water no longer shows any bubbles or “slickness” when you squeeze the foam.
Cold Water Finish: Execute a final rinse under a running cold-water tap. Cold water helps the synthetic fibers of the Silvercool matrix “snap” back into their original tight weave, helping preserve the form of the fabric.
4. Step 4: The “Towel Press” Drying Technique (The Heat-Free Zone)
This is the most critical stage of the entire process. Extreme heat is the number one killer of motorcycle helmets. Placing your liners in a mechanical clothes dryer, using a hairdryer, or leaving them in direct, harsh sunlight will cause the internal foam to shrink, the plastic anchoring plates to warp, and the antimicrobial silver-ion treatments to degrade.
The Proper Way to Extract Water
Do not wring or twist the pads like a wet rag. This mechanical stress will permanently deform the 3D-contoured foam. Instead, lay the wet liners onto a dry, clean, heavy cotton towel. Fold the towel over the pads and press down firmly with your palms. This uses the towel’s natural absorption to “suck” the moisture out of the foam without putting any structural stress on the liner’s form.
The Air-Drying Environment
Place the damp liners on a flat drying rack in a well-ventilated, indoor area away from direct sunlight. To accelerate the process safely, place a standard electric fan nearby to provide a continuous stream of cool air. Depending on the humidity levels in your area, deep-cleaned 3D cheek pads can take anywhere from 24 to 48 hours to dry completely. Never reinstall a damp liner, as this will immediately encourage the growth of mold and mildew inside your EPS shell.
5. Step 5: Reinstallation and Verification of Alignment
Once you have verified that the liners are 100% bone-dry (press deep into the foam to check for hidden moisture), it is time to reassemble your HJC fortress.
The Brow Tab First: Slide the front plastic tab of the crown liner into the forehead slot of the helmet. Ensure it is centered; if the tab is off-center, the helmet will feel crooked on your head.
The Rear Snaps: Push the rear crown snaps into their receivers until you hear a clear “click.”
Threading the Chin Straps: Thread the chin straps through the large openings in the cheek pads. This is a common mistake—if the straps are twisted behind the pads, the helmet will be uncomfortable and unsafe.
The Final “Snap” Check: Secure the cheek pad snaps. Run your finger along the edges of the padding to ensure they are flush against the internal EPS wall. There should be no visible gaps or bunched-up fabric.
What If My HJC Liner Is Non-Removable?
If you are riding an older model or an entry-level HJC with a fixed interior, you can still perform a deep clean using the “Sponge and Vacuum” method.
Dampen a soft microfiber cloth with the same baby shampoo solution and thoroughly “daub” the interior fabric until it is damp but not dripping. After 10 minutes, use a fresh cloth dampened with pure water to “rinse” the fabric by repeated daubing. Finally, use a wet/dry shop vacuum with a clean nozzle attachment to physically suck the moisture out of the padding. This removes the dirt and oils without saturating the internal electronics or EPS glue.
Final Review Summary: Maintenance Best Practices
| Action | Recommended Method | Why? |
| Soap Type | Baby Shampoo / Neutral PH | Prevents residue buildup in capillary fibers. |
| Water Temp | Lukewarm (30°C) | Prevents shrinking and warping of 3D foam. |
| Extraction | Gentle Palm Press (Towel) | Preserves the ergonomic 3D shape. |
| Drying | Air Dry + Fan | Prevents heat-related material degradation. |
| Frequency | Every 2-3 months | Prevents acidic sweat from eating the padding. |
Final Verdict
Deep cleaning your HJC helmet liner is an essential skill that preserves both your financial investment and your personal hygiene. By following the “Baby Shampoo” method and strictly avoiding mechanical heat, you ensure that your Silvercool or Supercool interior remains a fresh, dry, and supportive environment. A clean helmet does more than just smell better— no longer distracted by stale odors or itchy padding, you can remain entirely focused on the mechanics of your ride and the beauty of the road ahead.